
With this tutorial you will learn how to use Pepakura Viewer to assemble a paper model.
To create and modify the models you will need Pepakura Designer (which is not covered , Tutorial in preparation, )
INDEX OF THEMES TOUCHED IN THIS TUTORIAL
Part 1:
Introduction - How to Start
1.-But what is Pepakura Viewer?
2.-Where I can find files with .pdo extension?
3.-What kind of paper is better?
4.-How to set up the printer in Pepakura Viewer?
5.-What other tools do you need?
Part 2:
Software Guide
1: Download Pepakura Viewer
2: Download files from the web
3: Opening Pepakura Viewer
4: The interface - Screen layout
5: Opening .pdo files
6: Basic Operations
7: Printing our model
8: Printing when the paper type does not match
9: Printing without texture
10: Printing with downscaling in Pepakura Viewer
11: Putting ID numbers of the edges or edges
12: Assembling models using Pepakura Viewer
13: Menus
In this entry I will cover only Part 1:
Introduction - How to Start
This is a basic introduction in how to use Pepakura Viewer to assemble your Papermodels:
But what is Pepakura Viewer?
You can view and print this patterns in any kind of paper to build paper models or papercrafts.
In Pepakura Viewer, there are many features to help you to print and assemble paper crafts.
You can download the software here:
Download Pepakura Viewer
Where I can find files with .pdo extension?

This files are shared in several sites around the Web for free in the major of the cases, Pepakura Page has thousands in its gallery:
http://www.tamasoft.co.jp/pepakura-en/gallery/list.php
What kind of paper is better?
That depends largely on the type of model and method used.
For small models regular bond paper (75-80 grams) is the most suitable, the same applies for simple models. Some need to be reinforced with cardboard,for these case you can print on plain paper and then glue on the cardboard backing.
But for large-scale models and models at a scale 1: 1 of helmets and armor that later will be reinforced fiber glass resin or putty, it is preferable to use cardstock (150-180 grams) or cardboard, pinting is recommended in common cardboard or opaline. They can be found in any paper-stores and if purchased in large size sheets can be cut to smaller custom sizes.
You can also use other types of paper,there are several, the couche paper that comes in various thicknesses is an interesting option,is glossy, thicker and more resistant than the common paper, just do not forget to wait for the ink to dry well. The photo paper is another option, usually are heavyweight, but at a higher price.
How to set up the printer in Pepakura Viewer?
First you need to go to >File>Pattern Info
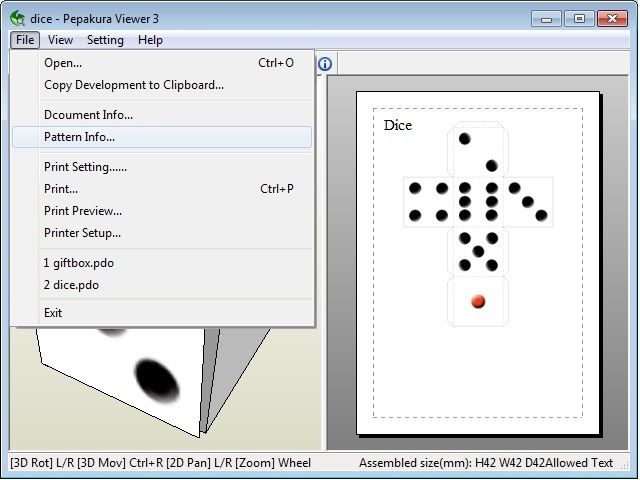
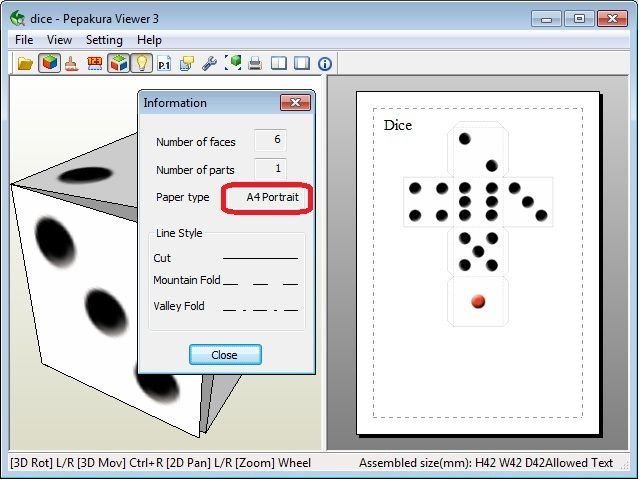
There you will find the Paper Type of the templates.The files are usually configured to be printed in 2 different sizes of paper:
-A4 size is used mostly in Europe and Asia
-Letter size is the most common in America
If you don't have the same paper size settings, you need to do certain operations to ensure that the model fits on the paper, an issue seen later in the tutorial (part 2)
- metallic ruler
- scissors
- cutter (snap-off blade knife), hobby knife, scalpel
- cutting matt (optional)
- Glue of some kind
Now you have all basic knowledge to start assembling your papermodels with pepakura viewer.
For a more complete guide in how to use this software visit part 2 of this tutorial(work in progress)
Original version (in spanish) here:
Tutorial pepakura viewer
No hay comentarios:
Publicar un comentario